5. ShippingBoard Lite
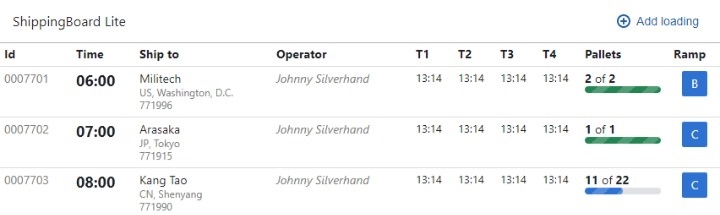
In this chapter we have job to add additional view to application ShippingBoard Lite. Now all loadings are displayed as a table and what business needs is overview what they have on loading ramps.
What we planning to do is:
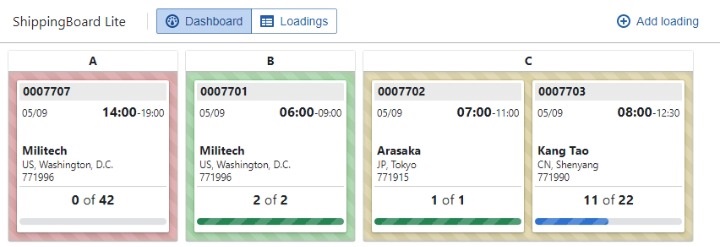
But what we have is:
Preparing workspace
To start working on this project you have two option: development using local or online editor:
- Online Editor
- Just go to stackblitz
- Local development
- Clone repo from shippingboard-lite and set branch to
create-ramp-view. You can use this command:
git clone --branch create-ramp-view https://github.com/adam-zielonka/shippingboard-lite.git- Open vs code for this project, if you still in terminal you can use this command:
code shippingboard-lite- Install dependencies:
npm install- Run dev server:
npm dev - Clone repo from shippingboard-lite and set branch to
Store info about view
Firstly we need to prepare area for our new view, but we also need it to define view also in store and action for changing. Because view is only information that is relevant on frontend there is store created for this purpose: UI.ts.
To distinguish on witch of view we are, we need to add field to class UI called view and also getters and action for it:
type View = "dashboard" | "loadings";

//...

export class UI {
  view: View = "dashboard";

  //...

  get isDashboardOpen(): boolean {
    return this.view === "dashboard";
  }

  get isLoadingsOpen(): boolean {
    return this.view === "loadings";
  }

  openDashboard = () => {
    this.view = "dashboard";
  };

  openLoadings = () => {
    this.view = "loadings";
  };
}
Creating buttons for view changing
export const Header = observer(() => {
  const { ui } = store;

  return <Navbar>
    <Navbar.Group align={Alignment.LEFT}>
      <Navbar.Heading>ShippingBoard Lite</Navbar.Heading>
      <Navbar.Divider />
      <ButtonGroup>
        <Button outlined icon="dashboard" text="Dashboard" intent="primary"
          onClick={ui.openDashboard} active={ui.isDashboardOpen}/>
        <Button outlined icon="th" text="Loadings" intent="primary"
          onClick={ui.openLoadings} active={ui.isLoadingsOpen} />
      </ButtonGroup>
    </Navbar.Group>
    <Navbar.Group align={Alignment.RIGHT}>
      <ButtonGroup minimal>
        <Button icon="add" text="Add loading" intent="primary"
          onClick={() => ui.openLoadingDialog(Loading.create())}/>
      </ButtonGroup>
    </Navbar.Group>
  </Navbar>;
});
Switching between views
export const Content = observer(() => {
  const { ui } = store;

  if (ui.isLoadingsOpen) {
    return <LoadingsTable/>;
  }

  return <div className="Content">
    Ramps
  </div>;
}
Add view to url params
export class UI {
  view: View = "dashboard";
  selectedLoading?: Loading;

  constructor() {
  init = () => {
    const urlSearchParams = new URLSearchParams(window.location.search);

    const view = urlSearchParams.get("view");
    if (view === "loadings") {
      this.view = "loadings";
    }

    //...

    reaction(() => this.view, view => addQueryParam("view", view, "dashboard"));
    reaction(() => this.selectedLoading, loading => addQueryParam("loading", loading?.id ?? "", ""));
  };

  //..
}
Create RampBox
import { Card, Elevation } from "@blueprintjs/core";
import { observer } from "mobx-react-lite";

export const RampBox = observer(() => {

  return <Card className="Ramp" elevation={Elevation.ONE}>
    <header>Title</header>
    <main>
      Value
    </main>
  </Card>;
});
And we need to use this box in Content component:
  return <div className="Content">
    <RampBox/>
  </div>;
Of course we need to add styles:
import "./Ramp.scss";
And we can use now Ramps that we have in store:
import { Card, Elevation } from "@blueprintjs/core";
import { observer } from "mobx-react-lite";
import { Ramp } from "../store/Ramp";

export const RampBox = observer(({ ramp }: { ramp: Ramp }) => {

  return <Card className="Ramp" elevation={Elevation.ONE}>
    <header>{ramp.description}</header>
    <main>
      Value
    </main>
  </Card>;
});
And now we need to pass ramps from store:
export const Content = observer(() => {
  const { ui, ramps } = store;

  if (ui.isLoadingsOpen) {
    return <LoadingsTable/>;
  }

  return <div className="Content">
    {ramps.map(ramp => <RampBox key={ramp.id} ramp={ramp} />)}
  </div>;
});
Create LoadingBox
import { Card, Elevation, ProgressBar } from "@blueprintjs/core";
import { observer } from "mobx-react-lite";
import { Loading } from "../store/Loading";

export const LoadingBox = observer(({ loading }: { loading: Loading }) => {
  const { customer } = loading;

  return <Card className="Loading" elevation={Elevation.TWO} interactive>
    <header>
      <div>{loading.id}</div>
    </header>
    <main>
      <div className="details">
        {loading.start.date}
        <div>
          <span>{loading.start.time}</span>-{loading.end.time}
        </div>
      </div>
      <div className="customer">
        {customer && <>
          <div className="name">{customer.name}</div>
          <div className="city">{customer.country}, {customer.city}</div>
          <div className="id">{customer.id.replace(/^0*/,"")}</div>
        </>}
      </div>
    </main>
    <footer>
      <div>
        <b>{loading.picked}</b> of <b>{loading.pallets}</b>
      </div>
      <ProgressBar animate={false} value={loading.loadedRatio} intent={loading.isLoaded ? "success" : "primary"}/>
    </footer>
  </Card>;
});
And try to display one in RampBox:
    <main>
      <LoadingBox loading={store.loadings[0]}/>
    </main>
Now we can add getter for Ramp store for retrieving lodgings assigned to particular Ramp:
export class Ramp {
  //...

  get loadings(): Loading[] {
    return store.loadings.filter(l => l.ramp === this);
  }
}
And we can use this in RampBox:
    <main>
      {ramp.loadings.map(l => <LoadingBox key={l.id} loading={l}/>)}
    </main>
In the end we can handle on click event to open loading details:
return <Card className="Loading" elevation={Elevation.TWO} interactive onClick={() => store.ui.openLoadingDialog(loading)}>
Add status to RampBox
export type Status = "empty" | "loaded" | "progress" | "not-started" | ""

export class Ramp {
  //...

  get isEmpty(): boolean {
    return !this.loadings.length;
  }

  get isLoaded(): boolean {
    return !this.loadings.some(l => !l.isLoaded);
  }

  get isInProgress(): boolean {
    return this.loadings.some(l => l.isInProgress);
  }

  get isSomeNotStarted(): boolean {
    return this.loadings.some(l => !l.isStarted);
  }

  get status(): Status {
    if (this.isEmpty) return "empty";
    if (this.isLoaded) return "loaded";
    if (this.isSomeNotStarted) return "not-started";
    if (this.isInProgress) return "progress";

    return "";
  }
}
And add style to RampBox component:
<main className={ramp.status}>
Add ramp status and quantity to content details
export type Status = "empty" | "loaded" | "progress" | "not-started" | ""

export class Ramp {
  //...

  get quantity(): number {
    return this.loadings.length;
  }
}
          {ramps.map((r) => <Button key={r.id} className="ramp-button" outlined
            active={r === loading.ramp} onClick={() => loading.setRamp(r)}
            intent={r.isEmpty ? Intent.NONE : r === loading.ramp ? Intent.PRIMARY : Intent.DANGER}>
            {r.description}
            <sup>{r.quantity > 0 && r.quantity}</sup>
          </Button>)}